Project Resources
Manuscript Basics
Chapter Structure
One of the most important goals when writing your publication is maintaining consistency. We encourage you to create a map of what each chapter will contain and in what order the elements will appear. This is especially important if you have multiple authors/contributors, as you want the finished product to have a smooth flow and uniformity.
Below is a list of some examples of features to consider. However, remember that too many features can (and do) interrupt the text and may confuse the reader. Carefully consider whether a feature adds value to your text. If there is no correlation to the instructional material, then there is little value in providing the feature.
Front matter:
- Dedication
- Foreword (used to promote the book, typically written by someone prominent in the field)
- Preface (include a list of features, the benefits of the publication, etc.)
- Acknowledgments (credit individuals who have assisted in the development of the publication)
- About the Author (include your academic/professional credentials, awards, and/or personal achievements)
Chapter:
- Learning Objectives
- Key Terms/Definitions
- Illustrations
- Tables/Charts
- Quotes/Callouts
- Summary
- Quizzes/Assignments (for web product)
End matter:
- Appendices
- Glossary
- Bibliography
Best Practices and Sample Formatting
Below are some helpful tips regarding the consistency and formatting of your manuscript:
Fonts: Use one font throughout the manuscript. You can call out quotes or key terms using a bold or italic version of that same font.
Headings: The style/size of the font communicates to the design team which type of heading to use. However you choose to differentiate your headings, it is important to be consistent throughout all the chapters. Below are some examples:
- MAIN HEADING: BOLD, ALL CAPS
- Sub Heading: Bold, Underline
- Sub‐sub Heading: Underline, Italic
Instructions: Highlight in yellow and place in square brackets any text that is not meant to be part of the actual text of the chapter. This typically involves directions from you to the person who will be formatting your content.
Figures & Tables:
- Embed any photos, illustrations or screen shots directly into the Word document. Provide image files separately as JPG, EPS, TIFF or PNG
- Set tables within your Word document and note any special formatting or spacing that should be maintained.
- Incorporate figure and table numbers within the text itself and indicate the location in the text where the images should be placed.
Styling: Don’t get hung up on styling your content in the Word document as you write. Our team will take care of this for you during the production process. However, feel free to make notes and highlight them in yellow to alert the team to specific directions or requests you have for how the text should appear.
Guidelines for Math & Equations:
- Use mathematical Word extensions such as Equation Editor or Math Type to create true equations.
- If using a mathematical Word extension to create a true equation, save it as a separate file. It is less time consuming and requires less proofing to edit an original true equation and import it into a layout program as an image.
- Set simple fractions with a front slash (/) to distinguish them from other math such as ratio or division (i.e., 2 1/2).
- DO NOT use MathType or Equation Editor for text. When you use these math software products, the programs essentially put the equation in a “picture box.” If you use this program for text it will also put the text in “picture boxes” and the files are too large to manage.
Photos & Illustrations
Author or Contributed Photos
- Provide images digitally as JPG, TIFF or PNG files in CMYK with a minimum resolution of 300 dpi.
- Name the image file according to the callout within the manuscript (i.e., Figure 1.1.jpg)
- Some photos may reproduce well when taken with a cell phone. Provide a sample to your publishing specialist to ensure the quality will be sufficient for reproduction.
- Avoid photos with paintings, art sculptures, or other creative works of art in the background, as we cannot publish these without the permission of the original artist
Stock Photos
- Innovative Ink's partners with Shutterstock (www.shutterstock.com).
- You do not need a username or password to access this site.
- Enter a keyword into the search bar and then copy/paste the image ID number into your manuscript.
- Example: [INSERT SHUTTERSTOCK IMAGE 1964873371 HERE].
- You can also include a thumbnail image embedded into the manuscript for reference as well, although this is not required.

Author Illustrations
- Provide images digitally in TIFF format with a minimum resolution of 600 dpi.
- Name the image file according to the callout within the manuscript (i.e., Figure 1.1.tif)
Covers
The first impression of your publication is its cover. Using the topics covered in your outline, stock photos you’ve selected, or any design input you want to provide, Innovative Ink's creative team will generate a quality cover for you. Here are some items to discuss with your publishing specialist regarding your cover:
- Confirm the final title/subtitle of your publication
- How should your name appear? (Do you want to include your middle initial? Academic degree?)
- Do you have any design input? (color preferences, types of images to avoid, etc.)
- Have you reviewed Shutterstock.com (our stock photo library) and selected specific images you want to include or will you leave the overall design up to the creative team?
Your publishing specialist will then facilitate the creation of a cover proof, which will be sent to you as a PDF for review.
PDF Annotation Directions
How to Annotate PDF files in Adobe Acrobat Reader DC
To view, print and annotate your article you will need Adobe Reader. This program is freely available for a whole series of platforms that include PC, Mac, and UNIX and can be downloaded from http://get.adobe.com/reader/. The exact system requirements are given at the Adobe site: https://helpx.adobe.com/acrobat/system-requirements.html.
When you open your file in Adobe Acrobat Reader DC, you will see the following buttons on the right‐hand side of the screen:

Click on the “Comment” button to open up the markup toolbar above the page:
How to...
Insert New Text
Click the “Insert Text” icon button on the Commenting tool bar. Next, click to set the cursor location in the text and simply start typing. The text will appear in a commenting box. You may also cut and paste text from another file into the commenting box. Close the box by clicking on ‘x’ in the top right‐hand corner.

Replace Text with New Text
Click the “Replace Text” icon on the Comment tool bar. To highlight the text to be replaced, click and drag the cursor over the text. Then simply type in the replacement text. The replacement text will appear in a commenting box. You may also cut‐and‐paste text from another file into this box. To replace formatted text (an equation for example) please Attach a file (see below).

Delete Text
Click the “Strikethrough Text” icon on the Comment tool bar. Click and drag over the text to be deleted. Then press the delete button on your keyboard. The text to be deleted will then be struck through.

Highlight Text & Make a Comment
Click on the “Highlight” icon on the Commenting tool bar. Click and drag over the text. To make a comment, double click on the highlighted text and simply start typing. Or, click on the "Sticky Note" icon to make a comment. Do not use this feature to make text edits.

Attach a File
Click on the “Attach File” icon on the Commenting tool bar. Click on the figure, table or formatted text to be replaced. A window will automatically open allowing you to attach the file. To make a comment, go to ‘General’ in the ‘Properties’ window, and then ‘Description’. A graphic will appear in the PDF file indicating the insertion of a file.

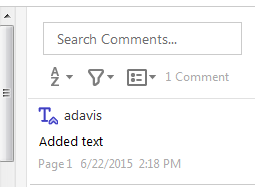
Review Comments & Edits
On the right‐hand side of your screen will be a running list of your comments. Simply click on the one you wish to review and edit, if needed.
Releases
To view, complete, and print a release you will need Adobe Reader. This program is freely available for a whole series of platforms that include PC, Mac, and UNIX and can be downloaded from http://get.adobe.com/reader/. The exact system requirements are given at the Adobe site: https://helpx.adobe.com/acrobat/system-requirements.html.
| IIP Photographer Release PDF IIP Interview Permission Release PDF IIP Model Release PDF IIP Illustrator Release PDF IIP Interview Distribution Release PDF IIP Permissions Letter Release PDF IIP Student Release PDF | Model Release A Model Release grants permission to reprint someone’s likeness in a product. The release simply ensures that the subject(s) of the photograph is aware his or her likeness will be used in a published work. Interview release An Interview Release grants permission to reprint someone’s interview in a product. The release simply ensures that the subject(s) of the interview is aware his or her responses will be used in a published work. Photographer Release A Photographer Release grants permission to reprint the person’s photos in a product. The release simply ensures that the subject(s) of the photograph is aware his or her photograph will be used in a published work. |